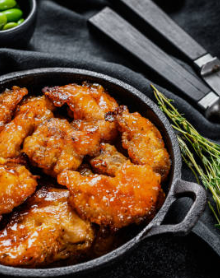
Crispy Honey Garlic Chicken Recipe: Sweet, Savory, and Irresistible
Few dishes strike the perfect balance between sweet and savory quite like Crispy Honey Garlic Chicken. With its golden-brown crispy coating and sticky honey garlic glaze, this crowd-pleasing meal delivers restaurant-quality flavor right from your own kitchen. Whether you’re preparing a quick weeknight dinner, serving guests, or simply craving comfort food with a flavorful twist, this recipe is guaranteed to become a family favorite.
The combination of crispy fried chicken coated in a rich honey garlic sauce creates an irresistible dish that’s packed with texture and taste. Every bite offers a satisfying crunch followed by the sweet, garlicky goodness of the glaze. Best of all, this recipe uses simple pantry ingredients and can be prepared in under an hour.
In this guide, you’ll learn how to make perfectly crispy honey garlic chicken, discover expert cooking tips, explore delicious variations, and find answers to common questions about this popular dish.
Why You’ll Love This Crispy Honey Garlic Chicken Recipe
There are countless chicken recipes available, but honey garlic chicken stands out for several reasons.
Perfect Balance of Flavors
The sweetness of honey complements the savory richness of garlic and soy sauce, creating a sauce that’s both bold and comforting.
Extra Crispy Texture
The seasoned coating fries up beautifully golden and crunchy, providing the ideal contrast to the sticky glaze.
Family-Friendly Meal
Kids and adults alike love the sweet-savory combination, making it a reliable dinner option.
Easy to Customize
You can adjust the sweetness, spice level, and even cooking method to suit your preferences.
Better Than Takeout
This homemade version gives you full control over ingredients while delivering restaurant-style results.
Ingredients for Crispy Honey Garlic Chicken
For the Chicken
- 2 pounds boneless, skinless chicken thighs or chicken breast
- 1 cup all-purpose flour
- ½ cup cornstarch
- 1 teaspoon salt
- 1 teaspoon black pepper
- 1 teaspoon garlic powder
- 1 teaspoon paprika
- 2 large eggs
- 2 tablespoons milk
- Vegetable oil for frying
For the Honey Garlic Sauce
- ⅓ cup honey
- 4 cloves garlic, minced
- ¼ cup soy sauce
- 2 tablespoons brown sugar
- 1 tablespoon rice vinegar
- 1 teaspoon sesame oil
- 1 tablespoon cornstarch
- 2 tablespoons water
Optional Garnishes
- Sesame seeds
- Sliced green onions
- Red pepper flakes
How to Make Crispy Honey Garlic Chicken
Step 1: Prepare the Chicken
Cut the chicken into bite-sized pieces for even cooking and easier serving.
Pat the chicken dry with paper towels. Removing excess moisture helps achieve a crispier coating.
Step 2: Create the Coating
In a large bowl, combine:
- Flour
- Cornstarch
- Salt
- Pepper
- Garlic powder
- Paprika
Mix thoroughly to distribute the seasonings evenly.
Step 3: Prepare the Egg Mixture
In a separate bowl, whisk together:
- Eggs
- Milk
This mixture helps the coating adhere properly to the chicken.
Step 4: Coat the Chicken
Dip each chicken piece into the egg mixture first.
Then dredge it thoroughly in the seasoned flour mixture.
Press gently to ensure the coating sticks well.
Place coated chicken on a tray and allow it to rest for 10 minutes before frying.
Step 5: Fry Until Golden and Crispy
Heat vegetable oil in a deep skillet or Dutch oven to 350°F (175°C).
Carefully add chicken pieces in batches.
Avoid overcrowding the pan, as this lowers the oil temperature and can result in soggy chicken.
Fry for 4–6 minutes per batch or until golden brown and fully cooked.
Transfer cooked chicken to a wire rack lined with paper towels.
Step 6: Make the Honey Garlic Sauce
While the chicken cooks, prepare the sauce.
In a saucepan over medium heat, combine:
- Honey
- Minced garlic
- Soy sauce
- Brown sugar
- Rice vinegar
- Sesame oil
Stir continuously and bring the mixture to a gentle simmer.
Step 7: Thicken the Sauce
In a small bowl, mix:
- 1 tablespoon cornstarch
- 2 tablespoons water
Pour the slurry into the simmering sauce.
Cook for 1–2 minutes until the sauce thickens and becomes glossy.
Step 8: Toss the Chicken
Place the fried chicken in a large bowl.
Pour the warm honey garlic sauce over the chicken.
Gently toss until every piece is evenly coated.
Serve immediately for maximum crispiness.
The Secret to Extra Crispy Chicken
Many home cooks struggle to achieve restaurant-style crunch. Fortunately, a few simple tricks make a huge difference.
Use Cornstarch
Combining flour with cornstarch creates a lighter, crispier crust than flour alone.
Keep Oil Temperature Consistent
Maintain an oil temperature around 350°F.
Oil that’s too cool causes greasy chicken, while overly hot oil can burn the coating.
Fry in Small Batches
Overcrowding lowers the oil temperature and prevents proper crisping.
Let the Coating Rest
Allowing coated chicken to sit briefly before frying helps the crust adhere better.
Use a Wire Rack
Cooling fried chicken on a wire rack preserves crispiness better than paper towels alone.
Best Chicken Cuts for Honey Garlic Chicken
Chicken Thighs
Chicken thighs are often preferred because they remain juicy and flavorful.
Advantages include:
- Tender texture
- Rich flavor
- Less likely to dry out
Chicken Breasts
Chicken breast works well for those seeking a leaner option.
Advantages include:
- Lower fat content
- Mild flavor
- Easy preparation
Either cut delivers delicious results when cooked properly.
Delicious Variations to Try
Once you’ve mastered the classic recipe, consider experimenting with these flavorful variations.
Spicy Honey Garlic Chicken
Add:
- Sriracha
- Chili garlic sauce
- Crushed red pepper flakes
The heat balances the sweetness beautifully.
Asian-Inspired Version
Enhance the sauce with:
- Fresh ginger
- Hoisin sauce
- Sesame seeds
This creates deeper, more complex flavors.
Honey Garlic Chicken Wings
Use the same coating and sauce on chicken wings for a game-day favorite.
Air Fryer Honey Garlic Chicken
Reduce oil while maintaining crispiness by using an air fryer.
Cook at 400°F for approximately 12–15 minutes, flipping halfway through.
Baked Honey Garlic Chicken
Bake coated chicken at 425°F for 20–25 minutes until crispy and fully cooked.
What to Serve with Crispy Honey Garlic Chicken
The rich glaze pairs wonderfully with a variety of side dishes.
Steamed Rice
Rice absorbs the flavorful sauce and creates a satisfying meal.
Popular options include:
- Jasmine rice
- Basmati rice
- Brown rice
Stir-Fried Vegetables
Vegetables add freshness and balance.
Great choices include:
- Broccoli
- Bell peppers
- Snap peas
- Carrots
Noodles
Serve alongside:
- Lo mein
- Rice noodles
- Garlic noodles
Salad
A crisp salad provides a refreshing contrast to the sticky sauce.
Roasted Vegetables
Roasted Brussels sprouts, green beans, or asparagus pair beautifully with the sweet-savory chicken.
Storage and Reheating Tips
Refrigeration
Store leftovers in an airtight container for up to 4 days.
Freezing
Freeze cooked chicken for up to 3 months.
Allow it to cool completely before freezing.
Reheating
For best results:
- Use an oven at 375°F
- Reheat for 10–15 minutes
Avoid microwaving when possible, as it can soften the crispy coating.
Common Mistakes to Avoid
Skipping the Cornstarch
Cornstarch is essential for achieving maximum crispiness.
Overcrowding the Pan
Cooking too much chicken at once lowers oil temperature.
Using Cold Sauce
Warm sauce coats chicken more evenly and creates a better glaze.
Adding Sauce Too Early
Toss the chicken just before serving to preserve crunch.
Not Patting the Chicken Dry
Excess moisture prevents proper browning.
Nutritional Benefits of Honey Garlic Chicken
While this dish is undoubtedly indulgent, it also offers nutritional value.
High in Protein
Chicken provides essential protein that supports muscle growth and repair.
Garlic Benefits
Garlic contains beneficial compounds associated with heart health and immune support.
Homemade Control
Making the recipe at home allows you to control:
- Sodium levels
- Sugar content
- Oil quality
This often makes homemade versions healthier than takeout alternatives.
Frequently Asked Questions
Can I Make Honey Garlic Chicken Ahead of Time?
Yes. Prepare the chicken and sauce separately, then combine just before serving.
Can I Use Frozen Chicken?
Yes, but thaw completely and pat dry before coating and frying.
Is Honey Garlic Chicken Spicy?
Traditional honey garlic chicken is not spicy. However, you can add chili flakes or hot sauce if desired.
How Do I Keep the Chicken Crispy?
Serve immediately after tossing in the sauce and avoid covering it tightly while hot.
Can I Make It Gluten-Free?
Yes. Substitute gluten-free flour and gluten-free soy sauce.
Tips for Restaurant-Quality Results
Professional chefs often rely on a few simple techniques:
- Double-fry the chicken for extra crunch.
- Use fresh garlic instead of garlic powder in the sauce.
- Simmer the glaze until glossy and thick.
- Toss the chicken quickly to avoid sogginess.
- Garnish generously with sesame seeds and green onions.
These small details can elevate your homemade dish significantly.
Final Thoughts
Crispy Honey Garlic Chicken is the perfect combination of crunchy texture and sticky, flavorful glaze. The sweetness of honey, the richness of garlic, and the satisfying crunch of perfectly fried chicken create a dish that’s both comforting and impressive.
Whether you’re cooking for family, entertaining guests, or simply treating yourself to a delicious homemade meal, this recipe delivers outstanding results every time. With a few simple ingredients and easy-to-follow steps, you can enjoy restaurant-style honey garlic chicken in the comfort of your own kitchen.
Once you try this sweet, savory, and irresistible recipe, it may quickly become one of your go-to favorites for weeknight dinners and special occasions alike.